
TOOLS AND ACCESSORIES

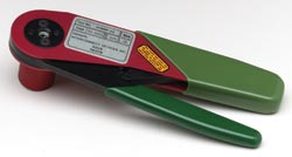
Receptacle Insertion Tool
Step 1 - To install a receptacle, insert the receptacle into the drilled hole. Step 2 - Next, insert the receptacle insertion tool directly into the receptacle and press lightly. Step 3 - This allows the receptacle to “seat” into the drilled hole. With a plastic tipped hammer, tap the top of the insertion tool until the receptacle has been positioned flush with the top of the drilled matrix. The press ring now holds the receptacle securely in place. With the receptacle in place, the spring contact probe can now be inserted. Note: Special fixturing applications sometimes require that the receptacle be placed above the drilled matrix. This requires a receptacle placement at the desired height. These “special height” Receptacle Insertion Tools are offered upon request. |
MODEL RECEPTACLE SIZE/BLANK
RT00 00 RT0 0 RTR50C, RTR50J R-50C, R-50J RT1 1 RTR075 R-075 RT2 2 RT100 R-100 RTR100 R-100 RT3 3 RT4 4 RT5 5 RT-SS30 RSS30 RT-SS40 RSS40 RT-SS50 RSS50 RT-SS75 RSS75 RT-SS100 RSS100 |
Crimping Pliers
Step
1 - To crimp, insert the largest diameter portion of the receptacle directly
into the hole on the flat side of the crimping pliers.
Step
2 - Take the prestripped wire and insert it into the receptacle.
Step
3 - Engage the crimping pliers fully.
Step
4 - The crimping plier clutch will release with a slight gripping action,
allowing one to pull on the wire to remove the completed crimp assembly.
|
MODEL RECEPTACLE SIZE/BLANK WIRE RANGE
CP00T R00T 30 GA CP00W R00W 30 GA CP0 0 28-30 GA CPR-50J R-50J 28-30 GA CPR-50C R-50C 28-30 GA CP1 1 24-28 GA CPR-075 R-075 24-28GA CP2 2 22-26 GA CPR-100 R-100 22-26 GA CP3 3 22-26 GA CP4 4 22-26 GA CP5 5 22-26 GA CP-SS30 RSS-30 28-30 GA CP-SS40-T R-SS-40-T 30 GA CP-SS40-W R-SS-40-W 30 GA CP-SS50 R-SS-50 28-30 GA CP-SS75 R-SS-75 24-28 GA CP-SS100 R-SS-100 28-30 GA |
TEST-X FIXTURE PRODUCTS
7117 ARLINGTON AVE, STE G, RIVERSIDE, CA. 92503
Ph 951-688-3067
EMAIL testxinfo@gmail.com
7117 ARLINGTON AVE, STE G, RIVERSIDE, CA. 92503
Ph 951-688-3067
EMAIL testxinfo@gmail.com